This past March, I came across some resources about how educators were using Slack to collaborate and do PLCs asynchronously and at a distance. I was very intrigued by the potential of this platform to help me solve an issue my education students face. Most of the teacher candidates in our programs end up working in rural schools. This means they are often the only person teaching their grade level or in their content area in the building, and sometimes even in their entire district. This holds a lot of potential for isolation and can be a roadblock to effective professional development. Our programs are cohort models, so I started looking for ways to help our cohorts stay connected to us, their professors, and to other students, their future colleagues (all be it at a distance). I wanted to model how an effective Professional/Personal Learning Network (PLN) functions. I believe PLNs are an excellent way to help insulate teachers from isolation in rural schools. In addition, our hybrid programs are about to significantly reduce our face-to-face time in favor of online learning (due to severe market pressures), so I’m searching for ways to help students feel more connected in a mostly online learning environment. As a result, I decided to bring Slack into my classes this spring to see if it would meet my needs.
I looked at a lot of different resources on Slack (I listed several at the bottom of this post) and decided it was worth trying for a few reasons. First, I saw it has the potential to be a way to keep teachers connected when they work in isolated areas. Second, I’m looking for ways to allow course conversations be more natural and informal (I’m not a fan of formal discussion boards). And third, I want something that allows students and professors to problem solve more easily while students teach in far flung K-12 classrooms for the duration of our hybrid programs. Our students do create their own private Facebook pages which seem to help the cohorts, but these do not allow for professor involvement in problem-solving and modeling how an effective PLN functions. Slack does seem to do these things.
First, I test drove it in a methods course with 6 students I taught for the previous 8 months. I find it more effective to test drive new technology with students I know well. Then, I tried it in a short 1-credit situation with 29 students at the end of their MAT program. One of the topics of this short course included DIY professional development (including PLNs), so it fit well into what I was already doing.
How I Used Slack
“Getting to Know Slack” Assignment – I used this assignment to help students become familiar with the platform and to show students the types of things I’d like them to use it for as we learned about opportunities for online professional development.
Slack App – I encouraged students to download the Slack app for their computer or phone. This seems to encourage better engagement than using it in a browser.
Students shared assignments – Assignments turned in via Slack were mostly lesson plans and curated resource lists that I wanted students to share with one another. Students directly uploaded documents, shared with Google Drive or Dropbox, and dropped in links to social bookmarking lists using services like Diigo. Since this was my first foray with Slack, I also had students turn in documents to Canvas (our LMS) as a failsafe. All grading was done in Canvas. It was handy for students to have immediate access to each other’s work, but over the long term, it was too disorganized to have that in Slack. We decided a Google Drive folder or a Google Drive Team might serve better for sharing work.
Announcements – I did all announcements for the face-to-face class in Slack. I found this meant I provided them more information of this type than I normally do, but I tried to keep it brief.
Lots of DMs – Students in both classes used the Direct Message feature a lot. In the larger class, I told students to DM me rather than email me. Personally, I liked this method a lot better than email. Some of my students told me they liked it better as well.
Silent Chat – Students in the face-to-face class had a silent chat to help familiarize them with the platform and share classroom management strategies.
Organize a field trip – My online course used Slack to help organize a field trip.
Polls & RSVPs – I tried a poll app, but it was too clunky and not user-friendly. So I reverted to using emoji responses for easy polls. Students voted on things and RSVP’d for optional class events. Here is an example of a RSVP:

Sharing Resources – I shared resources with students as I came across them in my own professional reading.
RSS Feeds – Both students and I added blogs feeds, YouTube channels, and Twitter feeds through various RSS type apps in Slack. I didn’t like how the Twitter feeds only came in as a link to the Tweet instead of the Tweet itself. I used Zapier to bring in YouTube channels. The RSS app was handy, but students found it challenging to locate RSS information to add. (Lots of blogs seem to have abandoned RSS in favor of email subscriptions? This is disappointing to me.) I also created my own private RSS feed channel for blogs I like so it could serve as a sort of personal feed reader.
Directed students to create their own channels – I did this more in the online course and had the students decide most of the channels they wanted for the team. However, I don’t feel I set up that particular project too well and it didn’t work out how I wanted it to. I like the flexibility for students to create their own channels, but I need to provide better context on how this can work to their advantage.
Created channels for the other classes they were taking & invited the faculty – One of our faculty was good enough to interact with students a bit in the team.
Apps – I used Giphy, Google Calendar, Zapier, Booky, Dropbox, Google Drive, RSS, and Simple Poll.
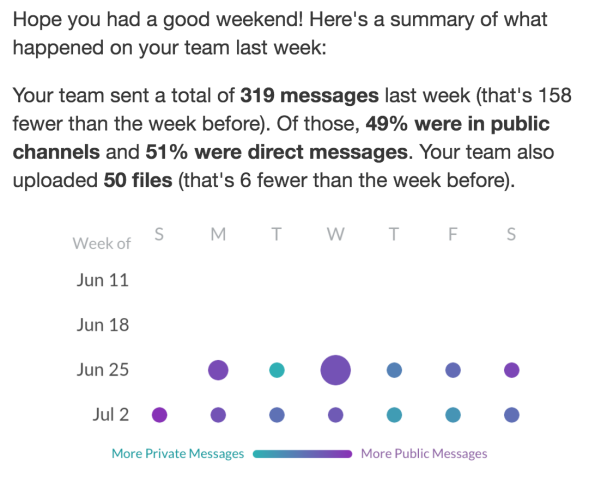
Basic usage stats – These were pretty interesting. Here are the stats for the second week of the face-to-face class. Just for reference, the silent chat happened during the first week.
Setup
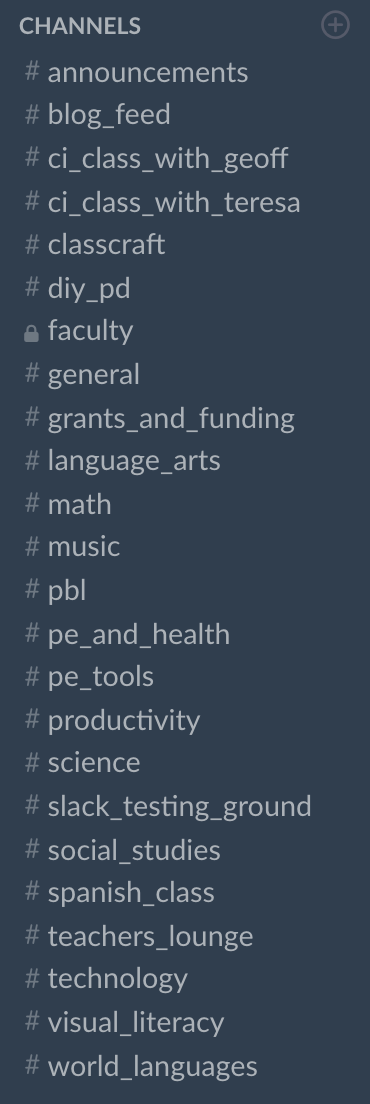
Here are the channels from each team.
This class was an online social studies methods course where I added some channels and then had students add channels for things that interested them.
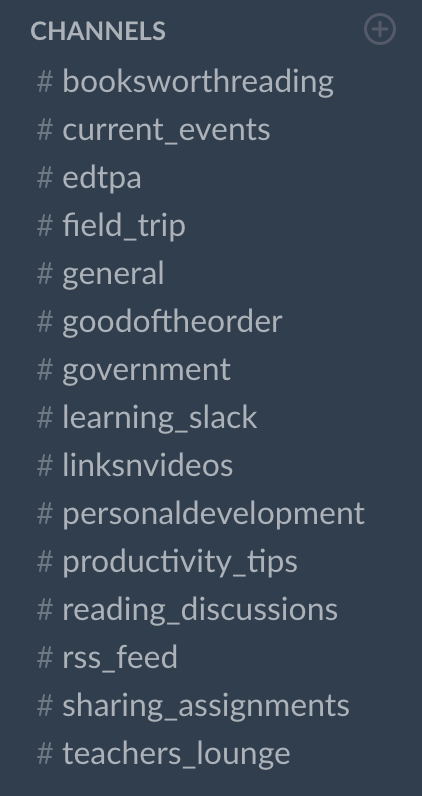
This was the setup for the face-to-face course in a secondary education program. Each content area had their own channel, along with a few for the other classes happening during that term. There were also a few topic specific channels related to what we were studying, such as #diy_pd and #grants_and_funding. Students created some channels on their own such as #class_craft and #pe_tools.
How Students Used Slack
Organize – Students used Slack to organize their own after hours face-to-face PD session on teaching with ClassCraft.
Channels – Students created channels related to their interests.
Collaboration – Students shared resources, reviews, and helped one another problem solve. Group pictures were also shared.
They Stopped – Students stopped using the team almost as soon as the classes were over. In both cases, the cohort already had a very active (as far as I can tell) private Facebook page that already served their collaboration needs. However, I did get some positive feedback from some of the students encouraging me to start using Slack right away with the incoming cohorts.
What I Want To Do Next
- Create a Slack team for each cohort instead of for individual classes. Each class can have its own channel.
- Do a better job of teaching students how to use Slack from the beginning.
- Do a better job of checking in with students on notifications and ask them to review these every so often.
- Be more intentional about channel setup. Include the channels I know I want and allow students to add to that. I just need to make sure it is not overwhelming at first.
- Provide Slack as a venue for virtual office hours for students at a distance.
- Get students checking-in, reflecting, problem-solving, & sharing resources of their own accord.
- Connect my secondary methods students to myself and to each other before starting their methods courses. In the previous version of the program, I had classes with them almost the whole year. I now have them for less than half that time in the new program (but for only 1 credit less than before). I want these students to be a solid collaborative PLN and cohort throughout the year.
- Synchronous chats for online courses modeled after Twitter education chats.
- Encourage students to create private channels (they don’t have to invite me).
- Explore more app integrations.
- Explore integrations with Canvas.
This is still a work in progress for me, but I’m happy with the results so far. I plan to continue exploring this platform and how it can serve my purposes.
How have you used Slack or how do you want to use Slack in your classroom or for professional development? Do you use a Slack alternative and how do you like it? What questions do you have?
Slack Resources
- Using Slack as a Teaching Platform by Steven Michels
- Using Slack for Teaching by Steven Michels
- Notes on Teaching with Slack by Zach Whalen
- Using Slack in the Classroom by Jeremy Bradbury
- Using Slack in a High School Class by Brent Simpson
- Using Slack Guide by Mathew Kushin
- Is Slack the New LMS? by Mathias Elmose
Slack Teams for Educators


 I’ve gotten good student responses from this series. You have the choice of a free streaming version or prices that range from $1.99 – $3.99 on iTunes. You can stream many of the full episodes or clips for free at the
  I have shown clips and full episodes from this series on the White House in my classroom. In particular, I show an episode from season 3 called


